Saturday, December 29

Out of the Cubical - When You're Sick

I can't believe it's been a month an a half since I posted on here... Actually, that's not true. I can believe it because I remember what I've been doing for the last month.


ORDERS.

ORDERS.

ORDERS.

ORDERS.

ORDERS.

ORDERS.

ORDERS.

ORDERS.

AND MORE ORDERS...

I posted briefly on my Facebook page about how lucky I am to be working so hard at something I love so much.  Even after weeks after weeks of 80 -90 hours I still never quite feel like it's a job.  I never dread it like I have so many jobs before. 

Today, however was one of those days, that I really wished I had a 9-5.  After Christmas ended, several of my family members came down with an awful cold. I really don't even want to call it a cold, because it's really more like death.  I won't go into all the details but I've never been this sick before. 


Sorry for the bad picture, but I needed some sort of visual,
and a self portrait would not have been as pretty!

Wednesday evening I started to feel a little under the weather, and by Thursday I could barely stand up.  I managed to get Kaleb off to my Grandparent's house since I knew I'd be in no shape to care for him.  I debated going to the doctor, but wasn't sure it was necessary.  I woke up Friday morning with the worse cough ever. Luckily my Grandparent's were available again, and I marched myself down to the urgent care.  The doctor of coarse couldn't do much but offer a prescription cough syrup and rest.

Of coarse even though I had allotted time during the holidays for family and friends when quoting turnaround time on orders, I failed to calculate in this dreaded illness.  So during all of this I was attempting to find time to fit in more orders.  What normally takes me a 1/2 a day to do, took 3 days total. I couldn't focus, couldn't work for more than 10 minutes at a time, but I had promised to get them out, and I know customers were getting antsy. 

It's days like these that although I wouldn't ever want to do anything else, I realize that this career path isn't perfect.  There are flaws to it.  If I was working a 9-5 I'd have called in sick, and someone would have covered for me.  I suppose I really need to learn from this and adjust.  The bottom line is, I always get sick after completing something highly stressful.  When I was in college I knew I'd be at home with a cold a few days after finals.  My body finally relaxes and let's it's guard down and BOOM. SICK.

Next year I plan to have a friend who's willing to send out reply emails saying I'm out for a few days so I don't have to worry about checking them.  I also think after I cut off Christmas orders I'm going to just put the shop on "Vacation." In reality I need a few days of no emails, no nothing around the holidays.  This is more realistic about what to expect from me between Christmas and New Years, and therefore more accurate and fair for both customers and my family.

I'm not complaining here, but for those of you hoping to quit your day job and follow your dreams. Make sure that you take into account these times. For me, it's worth having to work when I'm sick. I'd much rather have it that way, and still be able to pick Kaleb up from school everyday and work from home than anything else.

Friday, November 16

HUGE GIVEAWAY


It's been a little while since I've been able to do a giveaway so I've decided to make this a big one!!!!

Here's the deal:
I'll give away a $25.00 gift certificate to 4 people if we hit 1,500 facebook fans by 11/23/12

Q. How do I help hit 1,500 fans?
A. Share, Share, Share.  Tell your friends, tell your family, tell you co-workers, tell your baristas! One of the best ways to get it out there, is by going to the facebook page, finding your favorite piece, and sharing the picture on  your page!

Q. What if we don't hit 1,500 fans by Friday?
A. There will be no give away! So SHARE!

Q. How do I qualify to be in the drawing for one of the four winners?
A. Comment on this post and tell me what your favorite part about Jonesing for Jewelry is.  The customization? Friendly help? Special one of a kind pieces?

Q. When do I have to comment by to enter?
A. You have up until the drawing time to comment!

Q. Can I comment more than once?
A. Sure! but only one comment per person will be entered.

Q. When will the drawing be held?
A. Saturday November 24th in the AM time

Q. How will I be notified?
A. I'll post a new blog entry with the winners. If you're afraid you'll forget to check, I suggest clicking the RSS feed button on the right side and subscribing to this blog. With the right settings you can get an email notification for each new post, including the winners, and giveaways in the future!

Q. How do I claim my prize?
A. I'll give 3 days from when I post the winners to email me at Carin@Jonesingforjewelry.com


Good Luck!  Start Commenting NOW!!! and don't forget to TELL EVERYONE!


Sunday, November 4

HAPPY 5TH BIRTHDAY


This past week we celebrated Kaleb's fifth birthday! His actual day was filled with so many fun things, breakfast muffins, Slurpee after school, and he even got to get McDonald's (his dinner choice)!

Since his birthday fell in the middle of the week, we decided to hold off and have his party this past weekend.  He got to invite lots of friends from school, family friends, and cousins.  As I'm sure you know, Kaleb is obsessed with all things Lego.  So I've been working hard getting ideas for this party for some time now. Here's what I ended up including:

  • BIRTHDAY INVITES: Using some of my jewelry boxes. We first painted them dark green. Then used a circle punch and some foam sticker dots to add a Lego effect to the outside.  Inside the box a Lego mini figure had all the party info, plus there were a few Legos inside to set the tone!

  • LEGO CAKE: This really couldn't have gotten any cooler! I first made a 2 layer cake.  Then I cut it in half.  On each of the insides I stacked Lego candy.  After frosting it with a regular can of store frosting, I covered it with fondant.  And decorated it construction Lego sets that Kaleb helped me build.  It was surprisingly easy.  The bottom line is fondant covers all mistakes! ;) We even decked it out with construction cone birthday candles
  • LEGO BIRTHDAY FAVOR BAGS: This also was really easy. I just went to Michael's and grabbed a set of 12 birthday bags and 1 page of colored paper to match. I used another circle punch and the same foam dots to decorate the bags. Plus I cut out plain mini figures for the kids to write their names on so the bags didn't get confused at the party.  Inside contained: Lego stickers, a bag of Lego candy, plus a mini figure and a set of 4 wheels that we used during one of the games.
  • COLOR A MINI FIGURE: This was a great intro game that the kids did while we waited for everyone to arrive.  They got to use crayons and color a few pages of yellow paper that I had printed different sizes of mini figures one.  It kept them busy for awhile.
  • GUESS HOW MANY LEGOS: One of the other games we played while we waited for people to come, was having the kids guess how many Legos were in the jar.  The guesses were so fun, they ranged from 1 to 1,000,000,000 !! There were actually 123 legos in our jar!
  • DRAW A MINI FIGURE FACE ON A MARSHMALLOW: I went to Michael's and bought a bag of yellow candy melt (the frosting stuff they put on cake pops) I also bought a few bags of cake pop sets which had the stick, a bag to cover them and a wire tie.  I used jumbo marshmallows topped with 1 mini marshmallow to create the shape of a mini figure head.  Then I coated them in the yellow candy melt.  We found edible pens at our local cake decorating store (or you can get them from Amazon) Each kid got to draw a face on the marshmallows and take them home! So fun!
  • PASS THE LEGO: I made a simple Lego block out of a Kleenex size box.  The kids sat in a circle and when the music was on they pass the Lego around.  When it stopped whoever held the Lego was out!  It was easy, quick and they had a blast
  • PIN THE DOT ON THE LEGO: I bought a $0.99 poster board at the grocery store.  I traced circles where the Lego dot should be on all but one.  The last one I just intermittently traced where it should go. Then I cut the same size circle around a matching paper and put a few circles of blue painters tape on the back.  We blindfolded the kids, spun them around, and had them try and put the dot where the missing one was on the board. Also quick, inexpensive and super fun! 

  • LEGO CAR RACES: This was absolutely the hit of the party! Although it was the most expensive and most work, it was by far the favorite! I'm pretty sure if it's the only game I made they would have raced them the entire time and been perfectly content.  Even after it was all said and done, we brought out the racetrack again and the went back at it. I totally recommend this game! We Let each kid take out their wheels and mini figure out of their party favors bag. Then we gave them a slew of other Legos in all shapes and sizes to build their own car.  They got to use their mini figure as the driver.  I intended to have a little tournament, but they were have so much fun just doing the practice races we never actually competed.  The racetrack is made from a piece of plywood. I spray painted it black, and then used some white acrylic paint we had laying around the house to decorate it.  I put a few nails at the finish line and tied a string across to help decorate it. I also wrote "START" using black permanent marker
  • LEGO PULL PINATA: I got a big box from work, and first cut a trap door in the bottom.  In the door I punched a hole and hung one piece of curling ribbon from it.  Then on the inside I lightly taped lots of other curling ribbon. I filled the box with candy and covered it with green tissue paper.  Then using green paper and foam dots I made it look like a Lego. Each kid got to come up and pull one string. If it was one that was taped it just pulled out and nothing happened, but the one string that was attached to the trap door caused the door to pull open and all the candy to come rushing out.  I'm not going to lie, it was a little TOO much candy, especially around Halloween, but go big or go home right?!
Happy Birthday to my favorite person in the whole world. I love you son!


Sunday, October 28

Happy 1st Birthday Charm Shop!


Dear Charm Shop,

I really can't believe it's already been a year since you first opened.  I remember spending the weeks up to the grand opening staying up till 3 am editing pictures, writing listing descriptions, and just in an all around flurry. I knew you would be great, unique, and beautiful, but really never really knew how fast you would grow and just how amazingly perfect you would become. You took the little ideas I had and just ran with them. You became a life of your own and took those ideas to places that I could have never imagined on my own.


I'm so lucky and happy to have you little shop.  You bring so much to my life that I can't begin to thank you enough.  You provide me direction and confidence in where I am going, and that I can get where I want to be. You allow me to be creative and passionate about my work.  You give me the opportunity to meet amazingly wonderful people, all who are so in love with their families. People that inspire me to be a better mother and wife.  You give me the opportunity to spend good quality time with Kaleb. I have had time to pick him up from school, go on his very first field trip to the pumpkin patch, and stay home with him when he was sick. I know this means so much to him too, to have me not just physically around more, but also more able to be engaging with him. You provide me sanity (and a little insanity with it at times, but I'll forgive you for that.) You bring me and my family overall happiness and joy.


I love you so much.

Happy 1st Birthday Charm Shop. I hope you a better year than the last. Stay positive, keep growing, and keep smiling!


Saturday, October 27

Sterling Silver Etched Charms

Get Them HERE!


They're here! And I couldn't be happier with them! 

It's been a long road for these charms!  I first attempted them in PMC, although they worked, the time consuming process which required ordering portions of each from a third party, high cost of materials, and requirement of a kiln, meant that the price of them would have been just too high for my business model.  My goal has always been to be able to offer high quality products that everyone can afford.  I know you moms are just like me, we love to have sentimental pieces like this, but we always are putting our families wants and needs before our own.  By finding another way to make these charms, I can offer them at 1/2 the price as the PMC ones are offered at. This way we moms can be spoiled more often (like we should be)!

Each item is first digitized and edited just like the standard bezel set charms. They are then printed on a special toner transfer paper.  Once the metal is prepped the toner is transferred causing it to mask portions of it and protect it from the etching solution.  The process is quite lengthy still, but well worth it!

I know a lot of you out there order charms based on very neutral color tones so they can go with every one of your outfits. By offering all sterling charms they will not only match more of your items, but you can also swim and shower in them making them the most versatile and they'll last forever!

I don't know which of them are my favorite, for now I've made myself a double cluster necklace with Kaleb's handwriting, footprints, silhouette, birth date and pearl! Create your favorite piece here just in time for Christmas!

Wednesday, October 24

GRAND OPENING: J4JVINTAGE

WWW.J4JVINTAGE.ETSY.COM


The truth is, I LOVE THE CHARM SHOP! But there are days when I really want just a simple, fun, eclectic necklace. I've envisioned these vintage charms and this shop for a long time, and always knew someday I'd get here, and I'm so proud to say that it's here!

The shop offers the same 12 and 16 mm bezel set charms as the charm shop, but instead of setting your childs name, I have come up with a fun mix of vintage prints.  Some botanical, some animals, all beautiful!

To those you can add vintage words taken directly from my sweet 2nd hand dictionary to give it some sentimental value. The bronze charms add more vintage flair.  They range from a tiny acorn to a long textured feather. 

My favorite elements have to be the brass lockets. They all really open and you could easily pop in a picture or two.  They are so fun and cute! Plus at the $6 -$10 range they don't break the bank!

Last but not least there are several suprise elements like the sterling silver set crystals or the antler tips! These natural elements help give these vintage pieces the earthiness they need!

Oh and last but not least, there's always a bead or two to be added! This time I've chosen mostly pearls in a wide range of colors to help give the pieces some pop!

Have fun designing yours at www.j4jvintage.etsy.com


Sunday, October 14

Metal Etching

In an attempt to find methods to emboss, engrave, etch or some how put foot prints, handwriting and silhouettes directly into metal, I have been playing around with many new techniques over the past few months.  My first shot at it, proved very successful pressing images into metal clay.  Although this method works there are many factors that caused me to continue to dig for something better:

1. Time consuming
2. Costly materials = high retail pricing
3. Portions of the process need to be sent out to other companies to complete
4. Costly start up fees - (aka I  need a kiln!)
5. Look of metal clay

So after searching around, I came across metal etching.  Metal etching is a process by which you transfer an image using toner to metal and then submerge the  metal into an etchant bath.  The bath eats away at the metal that has been left exposed and leaves what has been covered by toner. 

Once I saw the technique I knew I had to order some supplies. The wait for them was the  most challenging part for me! I'm so impatient when I get a new idea! 

Here's a picture of attempt number 1.
as  you can see in the picture above, there's only copper pieces.  That's because I left the silver in the etchant too long and it completely ate away all the silver!  OMG!

Attempt number 2 has proven much better in silver arena (see picture below)

I'm really loving how the botanical images are turning out as they don't require (and actually look better) as high accuracy with the toner transfer.  This is where the edges of the toner aren't quite set to the metal causing it to peel off and the etchant to eat away at the edges.  However as good as this looks for the botanical images, it's not what I'm going for with the children's custom charms. So I have a little more testing to do with a few new products to help the transfer process.

However as you can tell in the picture below the copper toner transfer especially around the edges went quite well and are definitely ready to be listed!


On a side note, there is lots that I'm learning about etchants and the processes. See picture below:


This is where I accidentally touched the back of a copper disc prior to the etchant bath.  The oils from my skin act just like toner and made a thumb print!


I'm super excited with where this is going! Just need to practice a few more times and test a few more products before I think I'll be ready to offer these babies!


Sunday, October 7

columbus

 
 ALL SITES WILL BE HAVING A COLUMBUS DAY SALE STARTING NOW AND RUNNING THROUGH TOMORROW NIGHT! 

If you're buying directly from my shop at www.j4jcharms.bigcartel.com you can use the coupon code 1492CLMBSBLU at check out and it will automatically deduct $14.92 from your order over $100.00 (shipping not included).

However if you're ordering off Etsy at www.j4jcharms.etsy.com or www.jonesingforjewelry.etsy.com you'll need to pay for the whole order and I'll return you $14.92 from all orders over $100.00 (shipping not included) by Tuesday.


This is a great time to take advantage of sales in preparation for Christmas!


Saturday, October 6

Out of the Cubicle

It's been awhile since I did a little update about the business.  I thought of instead of writing about the ups and downs of how it's going, that instead I'd give a few tips of things that have worked well for me.  I know there are lots of you out there hoping to start your own creative business from home.  When starting mine, other successful sellers were a great source of information and support. 

So here are the things that I feel have not only made my business successful, but that I believe would help others in their creative at home business. Most of this will be based on the charm shop as it's been my most successful endeavor, but the other shops also play a role.

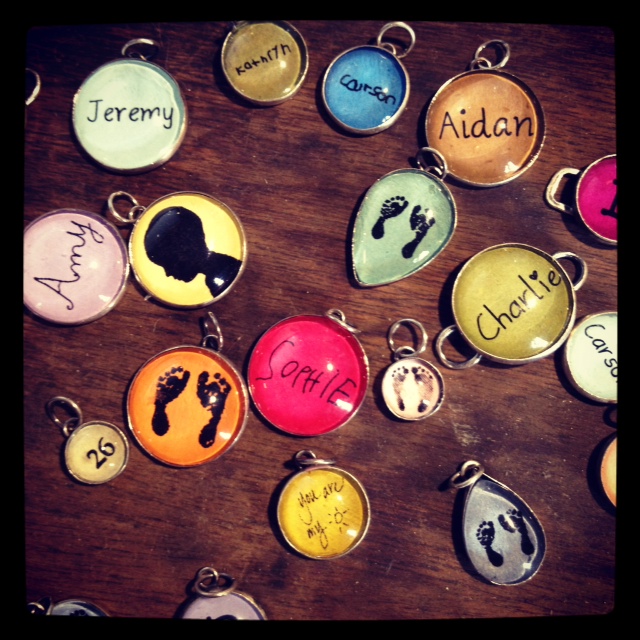
Stand Out: When I first wanted to transform my hobby into a successful creative business, I knew I'd be selling jewelry, but I honestly didn't know what type.  My regular Etsy shop has been open on and off for years as a way to sell items I had made just for fun. When I decided to open something more professionally I took months to research, test, and design items that would work. I tried a lot of things before I landed on the charms.  Although their are so many customizable jewelry options for mother's out there, most of them are the stamped version.  Mine offer a lot more options, colors, and printing styles, plus they are very competitively priced. 

Take it Seriously: This mindset is so important.  This might be the number one thing that makes or breaks creative home businesses. This will affect things from making sure you get the proper business license and are keeping good records to making the proper time for your business and treating your customers fairly.

When your  mindset is that you want your business to be successful you make more sacrifices for it.  Maybe make more time to work on it instead of going out with friends or even cleaning the bathroom. Maybe you set aside more start up funds for it or even decide to take out a loan. 

On top of it all, no one is going to believe that you can make it unless you do. I remember feeling so silly in the beginning thinking I could create a successful business out of a little desk in my living room, but I knew in order to make it successful I had to give it my all, and for me that meant believing that I couldn't fail. 

If you've ever interacted with me for more than a few emails you'll notice that I call the space I work in my "studio." It's not really, more just like a few spots around my house that I've stashed my jewelry items, but by calling it my studio I not only appear more professional, but I also feel more professional.  I don't do it to be untrue, but rather to make sure that the jewelry business and it's customers are getting top priority in my life.

Slow Growth: This might not be true for every business, but for me it's been the best business model.  I put in very little start up money for the business and continued to slowly move forward, buying tools and more supplies with whatever proceeds I had from the previous month.  Maybe taking out a large loan is the right choice for you and you just start big right out the gait, but I can't speak to this. Looking back, this method would NOT have worked for me, as I had a lot of learning to do out of the gate. If I had a large sum of money to spend on things, I would have wasted it in all the wrong places.  By having a smaller budget I had to take the time to first learn what was working and then spend a little at a time in those areas. I still have some products that I purchased thinking they would work out and never did, but the amount of wasted money was much smaller than if I had a large start up fund.

With that said, I haven't really been able to use any of the proceeds as income until recently.  Which has meant that I've been doing all of this hard work in my "spare time" while continuing to work a full time job.  This can be so hard for many people to stay motivated through.  For me I could easily see the direct correlation between how much effort I was putting in and the number of sales I had.  I knew I just had to keep pushing through.

Marketing: Oh marketing. I've had such a hard time picking where and when to market.  I've had places that I think I'd for sure get lots of business that just tanked!  For example, I did a "featured seller" piece on a local blog.  The blog is focused on just moms!  I thought for sure it would be the perfect place.  Sad to say, I saw ZERO return on it.  In fact, for me blogs just don't work! 

In  my experience the best marketing is one you can't buy. WORD OF MOUTH IS PRICELESS!  Remember your customer is part of a group of friends and family that most likely fall within the same target audience. By offering an amazing product, good customer service, and an easy way to share the item with their friends you've done all the marketing  you really need to do.  Remember bad word of mouth spreads twice as fast as good, so make sure you're providing the best you possibly can.

For me Facebook has been the best place for marketing. By posting photographs of each order when they ship customers get to preview their item and share it with their friends and family before they ever even get it!  Who doesn't love to show off such a sentimental piece. And realistically I've done all the hard work for them by posting the picture. All they have to do is like it, comment on it, or share it and it appears on their timeline for all of their Facebook friends to see.  It's a win, win for all.

Stay in Touch: This goes back to not only Facebook, but also my blog, and my email list.  By offering free shipping for Facebook fans, and posting pictures of their orders on Facebook, I automatically draw them to the site. By regularly posting new items, ideas, and giveaways there, I keep them excited and involved.  Then when I come out with a new product or sale, I have a large audience that I know will see it immediately.  Maybe they don't all take advantage of the sale, but the more people I have in this customer base, the better chance I have that a few do.

Celebrate: I try and make sure that each of my customers remembers that I'm a growing one person business and that they have the power to help me be successful.  Maybe by sharing my Facebook page, or leaving positive feedback after a purchase.  Each and every one of those acts may seem small to them, but they are very significant to me and my business.  This makes each and every one of my customers personally involved in my success and makes them desire to help where and when they can when I'm down and help me celebrate when I'm up.  So post about or even do a sale when you hit a major goal.  This emotional involvement keeps those fans going strong.

Primary Source: I adapted this idea from the credit union I worked at years ago.  They were constantly telling us that we wanted each and every member to use us as their "Primary Financial Institution." Meaning we didn't just want their checking account, or their auto loan, but rather we wanted to be the first place they came to when shopping for any and every financial product.

There are millions of people that make jewelry. It's the truth. I can't offer every product, but I work hard at making sure that my products are top notch, my packaging is great, my turnaround time is quick, and my customer service is unmatched.  By doing that I know that a good portion of my customers come to me first when shopping for jewelry.  Maybe I don't offer it, and maybe they go somewhere else, but by coming to mind I have a better chance of landing another sale after the first.  I love getting new customers and meeting new people, but I am always striving for the second and third sale. I think this is something my customers really appreciate, that they are appreciated long term, and aren't just one sale. I'm not pushy, but rather speak through my kindness, understanding, and ability to adapt.

Customer Service: I think of all the places that I regularly shop at, and the all offer great customer service.  They take items back no questions asked, they answer questions, and take the time to treat me like a person and not just a sale. 

Good customer service can just make your business that much stronger. People can love your products, but if you come across rude or even that you just have mediocre customer service, there is a good chance they won't come back. 

Look I'm not perfect, I make mistakes, but I own up to them.  If someone says a piece broke or it didn't turn out quite as they imagined. I try and fix it. I offer to take it back, make something new, or give them a discount.  This can be really hard in the beginning when each a sale means so much, but in the long run it's worth it.  Usually losing a little profit on this one sale is much better than having any sort of bad word of mouth that might be passed around by not working something out.  Don't let customers take advantage of you, but be honest about why you're offering what you're offering in a particular situation.

I also try and think about what I would want if I were in their shoes. For example, if I have a sale going on and the customer forgets to put in the coupon code, I automatically return the difference immediately to them.  Something like this speaks volumes about your honesty and integrity.  This is also one of the elements that can help you stand out as a hand made source of business rather than a huge corporation.

Lastly, I try and answer emails immediately.  I read somewhere back that email can bog you down and take all your time  up and that you should only check it 2 - 3 times a day.  I've tried this method.... sales went down.  I think of it as if someone walked into a physical location and asked a question. Would they have to wait 4 hours for an answer? Online sales can be tricky and people  have lots of questions.  Be helpful, honest, and get back to them as soon as possible. The longer you wait to respond, the more they have the chance to move on to something else or change their mind about the purchase. For me it's worth the extra time it takes to be continuously checking emails throughout the day.


Hope these tips help you become successful too!  I'm always willing to help others in their adventure, so feel free to email me with questions! Carin@jonesingforjewelry.com


Wednesday, September 26

j4jcharms grand opening!


WOOOO HOOO!!!!!!!!!!!!!!!!!!

IT'S FINALLY OPEN!

I've been working hard on getting the shops set up within my own website!  I'm  proud to announce that the charm shop is finally up and running and ready for you.  I'll still be offering products through Etsy, but this is a great way for people to shop within my site rather than being redirected.

I thought I'd take a minute to explain how the site works as it's a little different from my Etsy site

First off, you can still shop as you do on Etsy by choosing "Pre-Designed Items" in the Categories section on the side bar.  These items are set using standard chains and set amount of charms per listing.  For example a 2 Name Cluster Necklace will automatically come with a standard chain, two 12 mm charms, a metal and a bead charm. You'll still be able to choose custom printing instead of standard fonts, but these are slightly less customizable than the "build your own" style of the rest of the site.

HOW TO BUILD YOUR OWN ITEM:

STEP 1: Using the "Chains and Other Jewelry Bases" Category in the side column pick what chain or base you'd like.  These pictures show you what or how you can use the items, but they are for the BASE ONLY and no charms come with these particular items. This allows you to add or remove what you want on your own rather than waiting for me to set you up a custom listing. (although this is always still an option if you prefer!) 

This is also where you'll pick if you want the linked style verses the cluster or dangle style. This option is listed within the options before you add the item to your cart.


 STEP 2: After you've added your base to your cart  you are now ready to pick which charms you want.  First pick the size you want and then each listing is separated by color. This way you can see what pictures correspond to what color name on the color options chart. I know a lot of you have questions about which charms are what color. This separation is going to help us tremendously!


I also have the Custom Printed Items (ie. Handwriting, Silhouette, or Footprints) separated into their own category OR you can go under the size charm you want, click on your color, and then choose custom printing from the options before you add it to your cart (as shown in picture above)  The system I am using automatically calculates the upgrade fee!!!!! YEAH!!! This is going to save so much confusion for customers!


STEP 3: Add any special elements you want including metal charms, stamped hearts and/or beads. Under each listing there are different metals to choose from (if applicable) This will make it easy for you to mix silver, copper and brass to create a beautiful  look!

STEP 4: Once you're done designing click "checkout" in the top right column.  This is where it will ask you for your country to adjust shipping. If you have any coupon codes put them in here and click "update"

STEP 5:  Click "Check Out" this will take you to Paypal automatically and ask you to log in. Once you get all set there is a "Note to Seller" spot in Paypal. This is where you'll be adding any notes about what to print etc. This is very important as it's the only place that will allow the details to be printed on the invoice I use to create your piece. By inputting the details there it not only helps expedite orders, but also ensures accuracy. I cannot tell you how long it takes to track down our conversation via one of my 4 email addresses, Facebook, Twitter or even Etsy convos. Plus if we've had a conversation post the one I find when searching in which we change part of the design it can cause a serious mix up.

NOW GO SHOP!!!

OH AND USE THE COUPON CODE: GRDOPN25 AT CHECK OUT FOR 25% OFF  UNTIL 10/3

*** lastly, if you are ordering more than one piece at a time I am currently asking that you place separate orders to ensure all items are kept separate and less confusing when processing.  I'll be returning any additional shipping fees that may apply in these cases.

Monday, September 24

kiwi crate


Kaleb is always somplaining about how all the boxes that come from the mailman are for my jewelry business, and that nothing ever comes for him!  I've been trying to remedy this by starting up a few penpals with some friends, but he really loves it when something big comes. 

My mom was also apparently working on this, as we came home to a little green shoe box left by the mailman addressed to Kaleb Jones.  It was from a little company called Kiwi Crate. What we found inside was pretty magical.  A pre-cut, already set up art project with everything necessary to make a few stuffed fruit and an apron. 

Kaleb immediately wanted to start it as he LOVES art projects.  It took us maybe an hour and a half with Kaleb doing most of the work and me assisting. He had such a blast.  It was so fun to have something to do together without having the stress of finding projects, getting supplies and setting it all up. 

The best part is, Kiwi Crates are monthly subscriptions! I cannot wait to see what comes in next month's kit!

Thanks again Grandma, this was an awesome idea!

Sunday, September 16

Thursday, September 13

Custom Sterling Charms

Well I never know when it's the "right" time to announce new products.  Sometimes it seems too early and ends up meaning my customers have to wait a little longer until all the fine details are hammered out. Sometimes I wish I would have told you sooner because your excitement inspires me and gets me even more motivated. The bottom line is, with this one I'm way too excited not to share it!

This is something I have been wanting to do for awhile, but just recently finally came up with a feasible way to do it. It involves turning your child's handwriting, footprints or silhouette into a stamp and then pressing it into silver clay that when fired becomes pure sterling silver. Pretty awesome right?

I have so many ideas not only for ways to wear them but also different styles of charms. For example, the top left corner has a charm with the largest silhouette. In this one the edges are uncut leaving them looking more like a monogram stamped in a wax seal setting. Plus I want to toy with offering copper and antique brass instead of sterling (I can't help it. I love to mix metals!). And on, and on, and on...

I still have a few kinks to work out, sizing, pricing, plus testing the aforementioned items.  But seriously aren't you excited?


P.S.  If you aren't excited yet, you will be after I tell you that you get to keep the stamp too!  Yes that's right your own custom stamp of your child's handwriting... scrapbook lovers beware this could be pretty amazing!

Monday, September 10

STEPPING OUT OF THE CUBICLE

Well it's been a little while since I have done an update just for updates sake. As you can tell I've been super busy... (same old story!)  I have a ton to tell you, but where to start?

I was lucky enough to have the majority of the summer off. Kaleb's cousins came and visited and then with the transition to the new school Kaleb has been out for over 2 months! This is the first time in his whole life that he has had such an extended period of time out of school. He had a blast! It was so nice to get to bond with him and spend some quality time together.

With that though, the summer for my jewelry has just not gone quite as planned.  It's amazing to me how fast the days go when you have "nothing" to do! Last Mother's Day rush put me at a 2 - 3 week turnaround time on custom orders UGH!!!!  I thought for sure it would take me less than a month to get that back down, but the orders have kept up pace (YEAH!) and I haven't had any more time to devote to them.  It's very frustrating for me and I'm sure for those of you waiting on orders.  Being the sole owner and employee of the business means I have to wear a lot of hats. It's always hard to make sure you're spreading your time evenly around all aspects. This means that even though I hate being at 2-3 weeks I realistically still need to be devoting time to the new shops, new products, keeping people excited and interested, ordering, planning, accounting, and much much more. I'm learning that every aspect of this business is requiring lots of balance! Balance has been a tough thing for me to learn!


Although I'm feeling frustrated now, I'm very hopeful for the next few months.  I am so blessed to have such an amazing supportive family.  My parents have given me the opportunity to be off a majority of the time and work solely on my jewelry.  This is the absolutely most amazing gift that anyone could give someone... time. I'm so thankful to have time to put into the business and realize my dreams.  I'm so very, very lucky.

With all this support, and so many eyes on me to succeed I do feel a lot of pressure to make this work.  A year ago I decided this is what I wanted to do. Six months ago it became clear that there was a possibility it could work.  Three months ago it seemed like there was no way I could fail if I kept working at it, but now it's a reality. I have one year to make it work. I really don't have any back up plans, it's now or never.  It's scary.

At this point I have plenty of stuff to fill in my extra time with! I'm still in the process of listing my shops on my own website (see links above "Shop J4JCharms" "Shop Jonesing for Jewelry" "Shop J4JVintage") These now take you to the shop within my site instead of to Etsy. Although Etsy has been a great options for me, and will continue to bring in customers, I have a big enough following now that I think my own site is in order. These are huge undertakings for all of the shops.  I thought I'd need help with this and even posted on Facebook to family and friends about hiring someone part time to help list.  With all the extra time off from my day job, estimating how much work I can get done during a "normal" week is something I'm still getting used to. Actually, I haven't had a "normal" week yet, so I'm still  unsure how much I'll need help.  At this point I'm still just staying up late, working hard, and trying to get as much stuff done as possible all the time!

On top of that I have the J4JVintage shop to get up and running, a show coming, a new shop to get up and running, I'm developing the handwriting/silhouettes/footprints in sterling charms rather than set in the bezel settings, plus realistically Christmas is COMING SOON! I've realized that although I don't like being so busy like this all the time that no matter how much time I have off, I'm just one of those people that fills every second with something then get frustrated with how busy and stressed out I am all the time.  This is something I want to work on, but fear that I shall procrastinate on it again..... Maybe after Christmas time!


Saturday, September 8

BEFORE AND AFTER...


Yesterday I picked up some old items from a local shop.  She had found my old display from my "first attempt" at the charm jewelry.  For those of you that don't remember, the charm  jewelry started just about 2 years ago now in the regular shop. It consisted of 3 listings, 6 color options, 3 font options, and a handful of bead/metal charms. For the number of products I had listed,  I had a great response, and knew that I had to develop the idea more.

I had an idea in my head about what the charm shop would look like, what it would carry, and what kind of following it would have, but I could have never imagined it would have come so far in such a short amount of time.  Not only are there 100's of option to choose from, a ton more colors, so many ways to wear them, but I've also added the additional level of customization with being able to use your child's own handwriting, silhouettes, or foot/hand prints.

Plus the jewelry itself has come a long way. I've learned as a metalsmith, but also sourced better products for you.  On the left above is what the jewelry looked like 2 years ago.  It's hard to tell in the picture, but I was shocked yesterday when I picked it up.  What I am offering now far exceeds the quality in previous years.  Here's what's changed:

PAPER:
The paper is better.  I'm using high, archival quality paper which is smooth. Prior the texture of the paper took away from the printing.

WATER RESISTANCE:
They are now almost 100% waterproof.  I've played with lots of different products,  but what you don't see in the pictures is that they are really  now waterproof.  Over the past summer I've swam, showered and even washed in the laundry my charm jewelry... they are still intact and maybe even a little shinier!  No I still don't recommend you doing this all the time a the sealant could wear down since we aren't reapplying it over and over again, but it's nice to know that when accidents like this happen  you don't have to worry about losing such a great piece!

CLARITY:
The glass I have changed to over the past 2 years is just so much better quality.  It's clearer, crisper and more precise in size.  What you can't see very well in the picture is that before some of the glass pieces were irregular shaped or bubbled on the side causing the metal to be mishapped in the final product. 

METAL FINISHING:
When comparing the two side by side I can tell that my skills are better. I'm offering something that's joints are soldered tight and finished well. The pieces are top quality and ensure that they last a lifetime!  Plus with the help of a few new tools the metal is prettier. The oxidized look is smoother and super shiny. The prior finish is matte and less striking.  Plus I'm now able to offer the "bright silver" finish for those who like it which I couldn't before.

I cannot wait to see where the jewelry takes me in the next 2 years. Improving is something I love to do! Not only offering more options, but a better product.


Wednesday, September 5

1st Day of School


I cannot believe what happened this morning. I dropped Kaleb off at elementary school.....


....

....

....


... even just typing that makes me tear up. I cannot believe how big he is. I vividly remember the day he was born, the day he first rolled over, the day he first say "Mommy." None of that feels far away enough to say that I have a child in pre-K.

This whole experience has really come a year earlier for us, as we moved him to this amazing elementary school in pre-K to ensure him a spot for his next year.  I sort of feel like by doing this, I shorted myself out of a year of him being a baby.  Logically there isn't really a difference between sending him to pre-K at his old school verses his new school. Yet emotionally it is night and day for me. I had to take him back to school shopping, he has to bring a big boy backpack, he has a real cafeteria that serves hot lunch, he doesn't need me to walk him in anymore.  Where in the world did the past 4 1/2 years go?

I tried to prepare myself over the past few weeks for what I would have to do today. I wanted to be strong for him and make sure that he felt comfortable in his new environment.  I am proud to say that I made it through this morning without falling apart, but even as I type this I feel like if someone eyes me the wrong way I'll burst into tears! Proud, scared, excited... are all running through my mind right now.

As I walked away from this school this morning I noticed a tiny little house for sale across the street that has the perfect view of the main entrance and playground, and I promise you, as crazy as it is, I seriously thought about trying to buy it. It's way to small, it's in horrible shape, we're not buying a house any time soon, but what it does have is a window that I can look out of to make sure that he's OK during the day.  They could list the 800 sq ft house for $1,000,000.00 and I'd still want to buy it.

Luckly these first few days are only 1/2 days. I know he's having a great time in his new class, but I don't know that I could make it a full day today without him!

Tuesday, September 4

Aimee's Wedding Jewelry

One of my good friends Aimee is getting married!!!!!!!!!!!!!!!!

I'm so happy and excited for her! I'm also so honored to have been asked to make her bridesmaid's jewelry!  Aimee's goal was that each girl feel comfortable with their attire and so each girl got to pick their own dress and have input in the jewelry too!

After we got all of their inpute we met up and talked about dress color (teal shown in the Amy's dress and the background color of the picture sets) as well as flower and other wedding colors. The wedding is at the end of September and has a fall color scheme. The teal will be paired with cranberry colors, burnt orange, green and possibly a little pink! It's going to be beautiful I can't wait!

Here's a sneak peek at each girls dress along with what we created for them. The carnelian along with blue flash of the labradorite is going to be stunning with their teal dress color. Each girl's style as well as dress choice was taken into consideration when designing their pieces. So each girl had something that they would hopefully not just enjoy at the wedding, but for a long time to come!


Amy wanted something really chunky and was the first to suggest these beautiful stone choices! Her dress top is already pretty detailed so we made her a stunning bracelet!


Celeste really likes glass pendants, and although we decided to move into the stones for this wedding set, I tried to give her a large pendant that resembles a glass pieces.  Her pendant is also hung from a ring to elongate it. This will not only pair well with her halter top, but also ensures that the clasp doesn't slide down in front on the big day! Lastly, her carnelian beads only go about 4" up on both side making the back chain fit well with the halter.


Dionna had specifically requested a Celtic knot for her piece.  In this I hand forged a sweet Celtic knot out of thick sterling silver wire.  I hung it on a medium weight rolo chain that has the same carnelian and lab beads as the other girls. There are just a few intermittently spaced on the chain keeping it simple like her sweet dress.


Jenn's necklace and dress are also very simple and sweet so in her case I made a carnelian pendant to mix it up a bit.  It's much smaller than those labradorite stones so I dressed it up with a little thicker dotted wire setting.  It's also hung on a rolo chain that has sets of 3 labradorite stones going up the sides.


Saturday, September 1

Cannon Beach 2012


Cannon Beach is our little family tradition every year. It started when Dave and I honeymooned there 7 years ago.  It's a small quaint town little tourist town on the Oregon Coast. It's slow pace attracts easy going visitors who stroll around town, visiting candy shops, watching plays, and drinking good beer!


This year we invited Dave's parents and grandmother to join us there. They drove all the way from southern Colorado to come! They didn't get there until the second day, so after we got our tent and camp all set up we headed straight to the beach! It was in the 70's that day so Kaleb was thrilled!

It was the first time he had ever been to the beach (all the previous years we had celebrated our anniversary with a lone trip!)  He loved it! With just a few simple sand toys he was entertained for hours.

He also found a daddy orangutan. He has a mommy and baby he had got at the Cheyenne Mountain Zoo a few years back when visiting Dave's family. He loves them and carries them everywhere. We had been on the hunt for a daddy to add to the family, and he was in luck this time around! He named him "Bruce" after the candy shop where we bought him.


I've lived in the Northwest my entire life, and I still am surprised when it goes from 70 one day to monsooning cold, cold rain the next!  We attempted to stay as dry as possible the second day, but as much as Dave and I love to camp, we were both wishing for a hotel room by the end of the night! 

Of coarse with our luck that was the day Dave's family arrived. I'm pretty sure they thought we were crazy for asking them to come there when there wasn't much to do in the rain!


Luckily by the next morning it was pretty dry. In the morning we got some much needed beach time.  Dave's grandma, mom and I took a long stroll down to Haystack rock, Cannon Beach's claim to fame!  It's the largest intertidal rock in the world! 

Kaleb, Dave, and Grandpa spent the time making sand castles, chasing each other through the waves and enjoying the sun.


Our last day there we drove the 45 minutes south to Tillamook, OR.  For those of you who are fortunate enough to get tillamook cheese or ice cream where you are will understand how awesome it is to visit the place where it's made. There is a little self guided tour and you get to look down on the packaging facility as the cheese gets all wrapped up and sent out! 

My favorite is the store at the end. It has flavors you can't get anywhere else! I got smoked vintage white and black pepper! Dave ate habenero!  Needless to say my vegan diet went out the window that day!

All in all we had a great trip! I cannot wait to go again next year!